Thursday, March 10, 2011

Togepi Pattern


Because I like Togepi.

Materials:
Tan and white yarn
Crochet hook, duh (any size, as long as your stitches are tight enough that the stuffing won't show through)
Stuffing
Needle for sewing
Felt/fabric paint in black and white for the face and red and blue for the shell markings
Scissors (don't know why no one ever lists them, but I find them to be extremely helpful)

Shell:
With white:
Round 1: sc 6 in magic ring
Round 2: 2 sc in each (12)
Round 3: sc in next stitch, 2 sc in next around (18)
Round 4: sc in next 2 stitches, 2 sc in next around (24)
Round 5: sc in next 3 stitches, 2 sc in next around (30)
Round 6: sc in next 4 stitches, 2 sc in next around (36)
Round 7: sc in next 5 stitches, 2 sc in next around (42)
Round 8: sc in next 6 stitches, 2 sc in next around (48)
Round 9: sc in next 7 stitches, 2 sc in next around (54)
Round 10: sc around
Round 11: sc in next 8 stitches, 2 sc in next around (60)
Rounds 12-18: sc around
Round 19: sc in next 8, dec over next 2 around (54)
Round 20:: sc in next 7, dec over next 2 around (48)
Round 21: with tan and working through the back loops, sc around (48)
With white, working through front loops of round 21:
Sc, hdc, 2dc, hdc, sc, hdc, hdc, 2hdc, hdc, hdc, sc, *hdc, 2dc, hdc, sc* repeat * till end
F/O and stuff

Head spikes (make 5):
With tan:
Round 1: sc 6 in magic ring
Round 2: sc in next 2 stitches, 2sc in next around (8)
Round 3: sc in next 3 stitches, 2sc in next around (10)
Round 4: sc in next 4 stitches, 2sc in next around (12)
Rounds 5-7: sc around
F/O, but don’t stuff!

Head:
With tan:
Round 1: sc 5 in magic ring
Round 2: 2 sc in each (10)
Round 3: sc in next stitch, 2 sc in next around (15)
Round 4: sc in next 2 stitches, 2 sc in next around (20)
Round 5: sc in next 3 stitches, 2 sc in next around (25)
Round 6: sc in next 4 stitches, 2 sc in next around (30)
Round 7: sc in next 5 stitches, 2 sc in next around (35)
Round 8: sc in next 6 stitches, 2 sc in next around (40)
Round 9: sc around
Round 10: sc in first stitch; flatten one spike, and sc it to the head through the next 6 stitches (the top of the spike should be pointing towards the top of the head); sc in next 2 stitches; join another spike, sc in next 2, etc. After the last spike, sc in last stitch of round 10
Rounds 11-16: sc around
Round 17: sc in next 4 stitches, 2 sc in next around (48)
F/O, stuff and attach to shell

Arms:
In tan:
Round 1: sc 4 in magic ring
Round 2: 2 sc in each (8)
Round 3: sc in next stitch, 2 sc in next around (12)
Rounds 4-5: sc in each
F/O, stuff and attach to sides of shell

Feet:
In tan:
Round 1: sc 6 in magic ring
Round 2: 2 sc in each (12)
Rounds 3-5: sc in each
Round 6: dec over next 2 around (6)
F/O, don’t stuff; attach to bottom of shell

Give it a face and shell markings (I suggest doing anything with fabric paint last, because, trust me, it makes a mess otherwise), and unless I forgot something (and if I did, please let me know!), you've got yourself a handmade Togepi!

Pokemon and Togepi belong to Nintendo, not me (sadly). The pattern is mine. Don't try to sell it, or anything made from it, or pass it off as your own. Using it to make gifts or donations for charities/auctions is totally ok.

Sunday, March 6, 2011

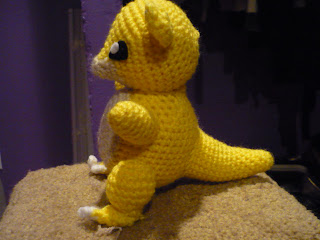
Sandshrew Pattern!


I made a Sandshrew! I feel like he took FOREVER, but I think that was mostly because I'm just lazy. Anyway, the pattern's relatively easy, except for the start of the head. Any questions, feel free to ask.

Materials!
Yellow, tan and a little white yarn
G hook, or any size that'll keep the stitches tight enough
Some black and white felt
Stuffing
Needle for sewing
Embroidery thread, if you'd like to put those little black lines Sandshrew has on it (I didn't, because I'm too impatient)

Here we gooooooo...

Head (starting with tan):
Round 1: sc 6 in magic ring
Round 2: sc in next stitch, 2 sc in next around (9)
Round 3: sc 3, switch to yellow, sc 3, switch to tan, sc 3 (9)
*Work the first 4 stitches of round 4 in tan, then switch to yellow; work 4 stitches, switch back to tan; work final 4 stitches in tan
Round 4: sc in next 2, 2 sc in next around (12)
*Work the first 5 stitches of round 5 in tan, the next 8 in yellow, and the last 5 in tan
Round 5: sc in next stitch, 2 sc in next around (18)
*Work the first 4 stitches of round 6 in tan, the next 10 in yellow, and the last 4 in tan
Round 6: sc around (18)
*Work the first 3 stitches of round 7 in tan, the next 18 in yellow, and the last 3 in tan
Round 7: sc in next 2 stitches, 2 sc in next around (24)
*Work the first 3 stitches of round 8 in tan, the next 24 in yellow, and the last 3 in tan
Round 8: sc in next 3 stitches, 2 sc in next around (30)
The rest of the head is just done in yellow (yay!)
Round 9: sc in next 4 stitches, 2 sc in next around (36)
Round 10: sc in next 5 stitches, 2 sc in next around (42)
Rounds 11-14: sc around
Round 15: sc in next 5, dec over next 2 around (36)
Round 16: sc in next 4, dec over next 2 around (30)
I’d start stuffing here.
Round 17: sc in next 3, dec over next 2 around (24)
Round 18: sc in next 2, dec over next 2 around (18)
Round 19: sc in next stitch, dec over next 2 around (12)
Round 20: dec over next 2 around (6)
F/O

Body (yellow):
Round 1: sc 6 in magic ring
Round 2: 2 sc in each (12)
Round 3: sc in next stitch, 2 sc in next around (18)
Round 4: sc in next 2 stitches, 2 sc in next around (24)
Round 5: sc in next 3 stitches, 2 sc in next around (30)
Round 6: sc in next 4 stitches, 2 sc in next around (36)
Round 7: sc in next 5 stitches, 2 sc in next around (42)
Rounds 8-18: sc around
Round 19: sc in next 5, dec over next 2 around (36)
Round 20: sc in next 4, dec over next 2 around (30)
Round 21: sc in next 3, dec over next 2 around (24)
Round 22: sc in next 10, turn (10)
Round 23: sk 1, sc in next 9, turn (9)
Round 24: sk 1, sc in next 8 (8)
F/O and stuff

Stomach patch (tan):
Round 1: sc 8 in magic ring
Round 2: 2 sc in each (16)
Round 3: sc in next stitch, 2 sc in next around (24)
Round 4: sc in next 2 stitches, 2 sc in next around (32)
Round 5: sc in next 3 stitches, 2 sc in next around (40)
Round 6: sl around
F/O; attach to body, then attach head

Arms (yellow):
Round 1: sc 4 in magic ring
Round 2: 2 sc in each (8)
Round 3: sc in next 3, 2 sc in next around (10)
Rounds 4-8: sc around
F/O, stuff and attach to body

Legs (yellow):
Round 1: sc 6 in magic ring
Round 2: 2 sc in each (12)
Round 3: sc in next stitch, 2 sc in next around (18)
Rounds 4-6: sc around
Round 7: sc in next 2, dec over next 2 around (18)
Round 8: sc in next stitch, dec over next 2 around (12)
I suggest you start stuffing here
Round 9: dec over next 2 around (6)
F/O

Feet:
Round 1: sc 6 in magic ring
Round 2: sc in first 2, 2 sc in next around (8)
Rounds 3-5: sc around
Round 6: sc in first 2, dec over next 2 around; switch to white in last stitch (6)
Round 7: ch 3, sl in second loop from chain, sc in other loop, sl through first and last stitches of round 6; sl next 2 stitches together (as in, the ones across from each other), ch 3, sl in second loop from chain, sc in other loop, sl last 2 together
F/O
Attach to legs, then attach legs to body. Don’t stuff ‘em

Tail:
Round 1: sc 6 in magic ring
Round 2: 2 sc in first, sc till the end (7)
Round 3: repeat round 2 (8)
Round 4: repeat round 2 (9)
Round 5: repeat round 2 (10)
Round 6: repeat round 2 (11)
Round 7: repeat round 2 (12)
Round 8: repeat round 2 (13)
Round 9: repeat round 2 (14)
Round 10: repeat round 2 (15)
Round 11: repeat round 2 (16)
Round 12: repeat round 2 (17) Round 13: repeat round 2 (18)
Round 14: repeat round 2 (19)
Round 15: repeat round 2 (20)
Round 16: repeat round 2 (21)
Round 17: 2 sc in first, sc till last stitch, 2 sc in last (23)
Round 18: repeat round 17(25)
F/O, stuff and attach to back


Ears (make 2 tan and 2 yellow):
Ch 3; sc in 2nd loop from hook, and next loop (2)
2 sc in first stitch, sc in next (3)
2 sc in first, sc in next 2 (4)
Holding a tan and yellow part together, sc around edges using yellow; attach to head

Add a face, and the lines if you'd like, and yayyy you're done!

Sandshrew and Pokemon belong to Nintendo. The pattern is moi's creation. If you'd like to use it to create a Sandshrew as a gift, or to donate to a charity or auction, that's wonderful, just please don't sell anything you make, and give credit where it's due.

Wednesday, March 2, 2011

Litwick/Hitomoshi Pattern

I've decided Litwick is my favorite fifth generation Pokemon, so I made one. She's not that big; maybe five inches, from top of the flame to bottom. I also made her shiny, because I had no purple yarn (weird, because purple is my favorite color). If you have any questions, just ask. I don't mind, really.

Materials:
G hook (fun fact: when I looked at my G hook the other day, I realized it's a G/6, which i found to be pretty awesome)
Worsted weight yarn in white, and either light and dark purple or blue, depending on weather you want a normal one, or a shiny one. Also, if you'd like to use thicker/thinner yarn and a bigger/smaller hook, knock yourself out.
Needle for sewing
Yellow felt for eyes
Some black yarn or thread for the mouth
Stuffing


Starting with light purple/blue:
Round 1: 6 sc in magic ring
Round 2: 2 sc in each stitch (12 stitches)
Round 3: sc in next stitch, 2 sc in next around (18)
Round 4: sc in next 2 stitches, 2 sc in next around (24)
Round 5: sc in next 3 stitches, 2 sc in next around (30)
Change to white in last stitch of round 2
Round 6: sc in next 4 stitches, 2 sc in next around (36)
Round 7: in back loops only, sc around
Rounds 8-13: Sc around
Round 14: sc in next 4, dec over next 2 stitches around (30)
Round 15: sc around
Round 16:sc in next 4, dec over next 2 stitches around (24)
Round 17: sc around
Round 18: working in back loops only, sc in next 2, dec over next 2 stitches around (24 front loops, 18 stitches)
Round 19: sc in next stitch, dec over next 2 stitches around (12)
Round 20: dec over next 2 stitches around (6)
F/O

Join yarn to round 18
Round 1: sc in next 2 stitches, 2 sc in next around
Round 2: sl, sc, hdc, dc, trb twice in same st, dc, hdc, sc, hdc, 2dc, trb, dc, hdc, sc, 2hdc, dc, trb, dc, hdc, 2sc, hdc, dc, trb, dc, 2hdc, dc, trb, trb, dc, 2hdc
Sl to 1st sl of round 2
F/O

Join yarn to round 7
Round 1: sc in next stitches, 2 sc in next around (42)
Round 2 (top wax drippings): You can get creative with this; I did a combination of single, half double, double and treble crochets, plus two stitches I may or may not have made up: it’s the same as a treble, except you wrap the yarn around three or four times, then draw it through two loops every time.
Sc, hdc, dc, trb, trb+ trb++
Sl to first stitch of round 3
F/O

Arms:
Round 1: sc 5 in magic ring
Rounds 2-4: Sc around
F/O attach to sides

Flame (dark purple/blue):
Round 1: sc 4 in magic ring
Round 2: sc in first stitch, 2 sc in next around (6)
Round 3: sc in next 2 stitches, 2 sc in next around (8)
Round 4: sc in next 3 stitches, 2 sc in next around (10)
Round 5: sc in next stitch, 2 sc in next around (15)
Rounds 6-8: Sc around
Round 9: sc in next stitch, dec over next 2 stitches around (10)
F/O, and attach to top

Attach the eyes, embroider on the mouth, and BOOM. You're done. You have yourself a Litwick. Or a Hitomoshi, if you prefer the Japanese name.